“Since the advent of the CD, listeners have been deprived of the full experience of listening.” - Neil Young PonoPlayers...
Read More »
Dirac Live Room Correction Software Review
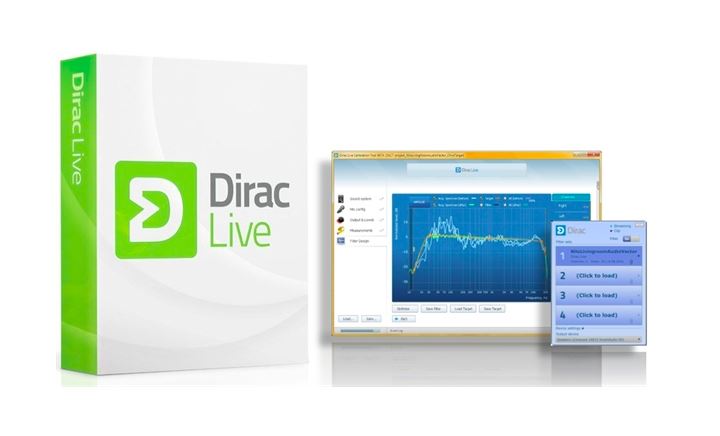
Room and speaker correction have been with us for sometime now, and are getting more sophisticated with every new iteration. I have been using the room correction built into my Meridian G68ADV surround sound processor to good effect for the past five or six years in my media room. But I have not made the leap in my two-channel listening room. Room correction products invariably involve extra analog to digital and digital to analog conversions, not to mention an extra box, power cord, and set of interconnects. With the complication, rapid change in technology, and expense, I just didn’t want to go there.
Then a few weeks ago I saw that Dirac Research had come out with a two-channel version of its Dirac Live mixed-phase impulse response room analysis and correction software (€389 or ~$525), formerly available only as a rather expensive multi-channel product. This is not your father’s PEQ. Although it wouldn’t help with vinyl playback, since most of my music collection is digital and ripped to a hard drive, it seemed like just the ticket.
I got in touch with Dirac, and in no time at all I had downloaded a copy and was set to put it through its paces. Fortunately, I already had a UMIK-1 calibration microphone and microphone stand on hand. If you do not have a calibration microphone, Dirac can supply you with one at reasonable cost. They are available elsewhere on the web as well. I strongly urge you to get a USB model. Otherwise, you are going to need to buy a microphone preamplifier and associated cables. Microphone stands can be picked up inexpensively at your local Guitar Center. You will want the boom variety for accurate placement of the microphone at various locations around your listening position.
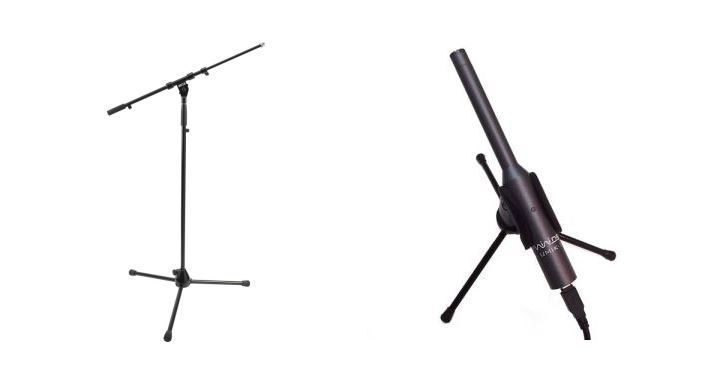
Installation of the software is easy - just a few clicks. Then plug in your microphone and you are ready to get started. Open the Dirac Live Calibration Tool program. The program automatically selects a stereo speaker setup. You will need to select your playback device, in my case the dCS Debussy DAC. You also will want to create filters for 44.1kHz, 48kHz, 88.2kHz and 96kHz, so make sure those boxes are checked. Dirac Live does not yet support filters for sampling rates above 96kHz, but I was informed that support for 176.4kHz and 192kHz is in the works and should be available shortly. Then click Proceed.
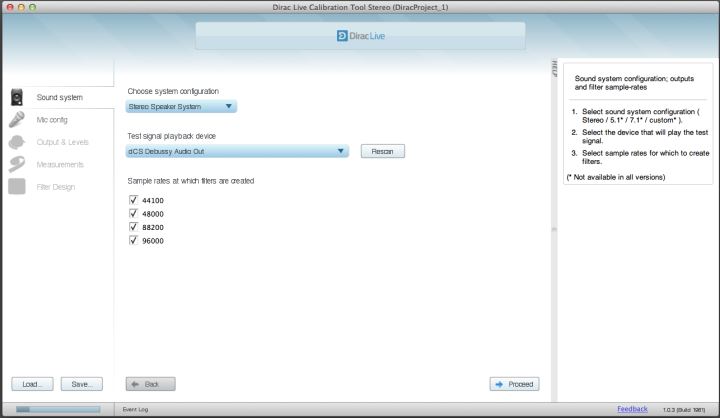
On the next screen, you will need to select your microphone as the recording device, and load its individual calibration file if one is available. Then click Proceed.
On the next screen you will need to set the input gain for your microphone. The default is about one-third of the way up the slider. For the UMIK-1 microphone, I needed to increase that to about two-thirds. You will also need to set your output volume. Again, the default is about one-third up the slider. Then click Proceed.
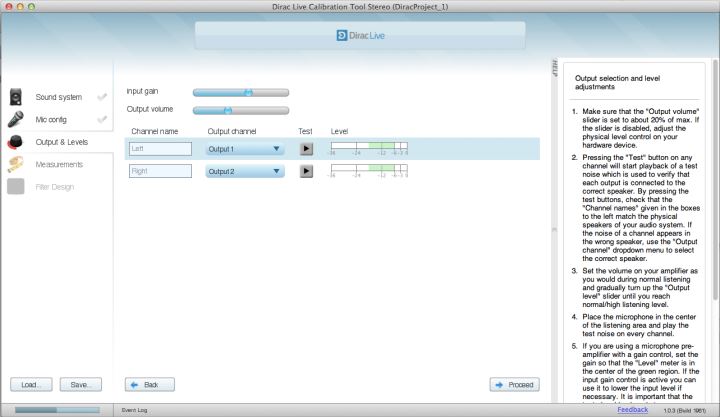
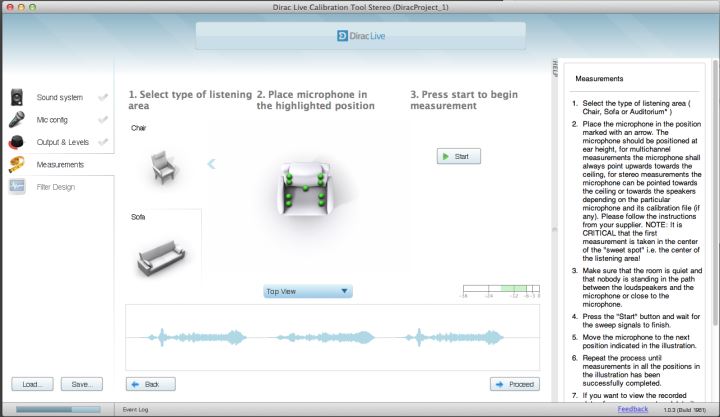
Now you are ready to place the microphone in the center of the sweet spot. When I first ran the calibration sweep, a dialog box informed me that the output was too low, so I had to go back to the preceding screen and adjust the output volume upward. Be very careful doing this. I increased the output volume too much for my second run and managed to blow the fuses protecting my tweeters. Talk about a panic attack! The best thing to do is just inch up the volume until it is sufficient. Once the output volume is correctly set, you will be prompted through the steps for taking nine measurements around your listening position. When you are finished with the measurements, click Proceed.
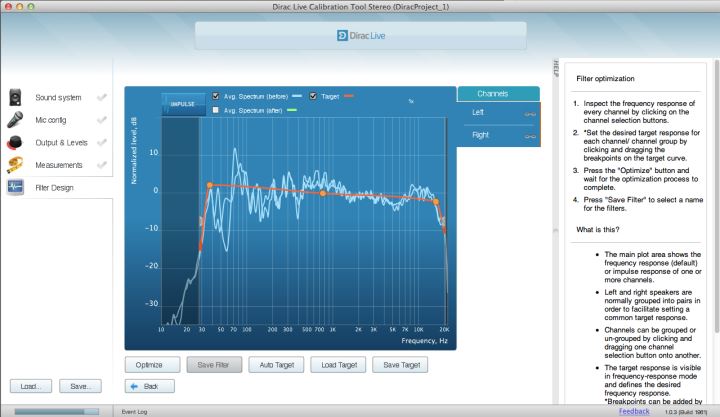
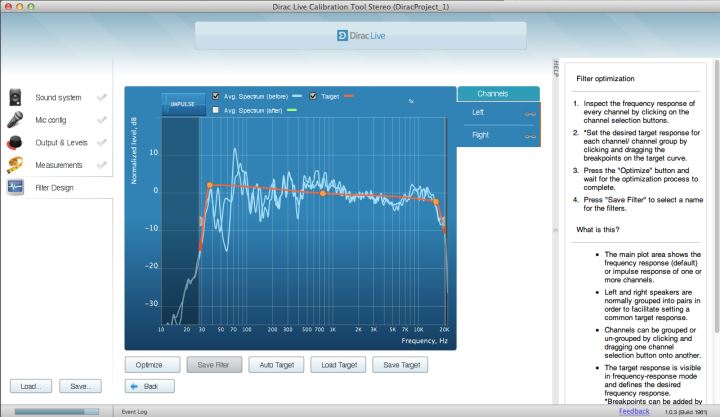
You are now shown your frequency response graph. As you can see, mine apparently looks terrible. Don’t worry, it is not as bad as it seems. Dirac Live only uses 1/8th octave smoothing when displaying its graphs. It would look much smoother - more like a wavy line than an EKG - if it used the more common 1/3rd octave smoothing. Dirac Live also displays a suggested correction curve. It is not a flat line; rather, it is slightly elevated in the bass and gently tapers down in the treble. Extensive research has shown that such a slope is generally preferred by listeners. Of course, you can move the points along the curve to select a different corrected frequency response if you want. I just accepted the suggested curve by clicking Optimize. You will then need to name and save both the filter and the file.
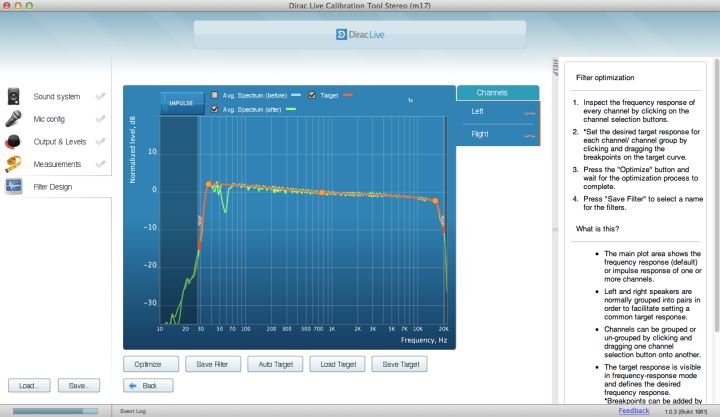
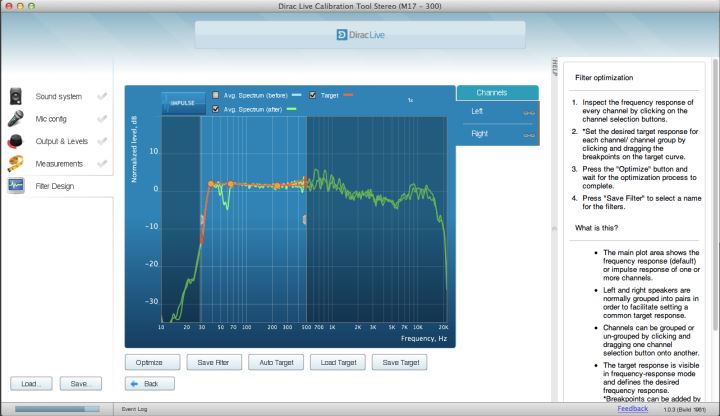
Shown below is the frequency response with the corrective filter in place.
You then exit the Dirac Live Calibration Tool and load the Dirac Audio Processor program. A dialog box will open up. You right-click on the first filter slot and select the filter you just created. Note that at the bottom there is a drop-down box where you select your output device. Make sure your DAC is selected.
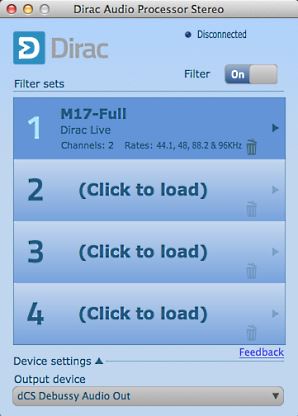
If you are using iTunes, you need to go into the Settings > Sound menu and select Dirac Live Processor as the output device. If you are using a third party player, you will need to do likewise in its settings menu. Output is now routed from iTunes or your player to the Dirac Live Processor, and from the Dirac Live Processor to your DAC. The whole calibration process takes about 20 minutes (unless you blow the fuses on your tweeters, in which case there will be some additional time required for deep breathing, troubleshooting, and sourcing new fuses.)
Now it’s time to sit down and listen to music. Take your laptop or keyboard with you to your listening chair if you can. You can toggle the filter in and out using either the “0″ key or the space bar, making A/B comparisons (with your eyes shut!) a breeze.
My initial evaluation was mixed. While the soundstage widened with Dirac Live, it was foreshortened, and the instruments lost their pinpoint imaging. In addition, the instruments lost body and the overall sound was somewhat thin. I thought perhaps it was just a new sound I wasn’t use to, so I left Dirac Live on for a few days and listened to a variety of music. It may have been more accurate, but whenever I did a comparison, I always preferred the sound without Dirac Live. Re-measuring over a wider area made little difference. Clearly a different filter was needed.
Transition Frequency
In acoustics, the Schroeder or transition frequency is that frequency below which sound is affected by the modal behavior of the room, and above which sound is affected by the statistical behavior of reflections. The transition frequency is calculated as 2000 times the square root of the quotient of RT60 in seconds divided by room volume in meters cubed. The problem in calculating the transition frequency for most normal sized listening rooms is that RT60 (the time it takes a sound to diminish by 60db) is technically not applicable to small acoustic spaces. Nevertheless, measuring RT60 and calculating the transition frequency can be helpful in a general sort of way. The RT60 in my 38 cubic meter room varies between 0.30 and 0.50 depending on frequency, yielding a transition frequency in the range of 178Hz-229Hz. If you don’t want to download and run Room EQ Wizard or other real time analyzer software to determine your RT60, just use 250Hz as an approximation. It’s close enough.
Given that, if I wanted to use Dirac Live solely to address room modes, I would limit the filter operation to 250Hz and below. Looking at the graph of my room generated by Dirac Live, however, you can see that there are some significant peaks and dips up to around 400Hz before the frequency response deviations become smaller and more uniform, so that is where I chose to limit the new filter’s operation. The corrected frequency response after the application of the filter is also shown below. I found that using that filter instead of the full frequency range correction gave a more pleasing sound. Gone was the thinness and lack of body I heard with full correction. In addition, although the soundstage did become wider than without correction, it retained its depth and pinpoint imaging. Everything just clicked into place with Dirac Live engaged. And the bass was tight. After trying several other filters, it is the filter I ultimately chose to go with. Naturally, your room, loudspeakers, and system components are different, so your results will likely differ as well. Don’t be afraid to experiment. And for heaven’s sake, rely on your ears and not your eyes when selecting a correction filter.
Playback Software Comparison
After trying various versions of Amarra, Pure Music, and Audirvana Plus over the years, I finally settled on Audirvana Plus (now at version 1.5.9) as my reference, largely because of its ease of use, graphical user interface, and seamless playback of DSD files. To use Audirvana Plus with Dirac Live, you need to uncheck “Direct Mode” (which bypasses CoreAudio) in the Audio System tab, and uncheck “Deactivate Completely iTunes Own Playback” in the iTunes tab. Audirvana Plus automatically recognizes Dirac Live’s 96kHz limitation, plays files up to 96kHz natively, and, using Izotope SRC, downsamples 192kHz files to 96Hz, and 354.8kHz and 176.4kHz files to 88.2kHz. Presumably, it will downsample 384kHz files to 96Hz as well, although I didn’t have any on hand to test. DSD64 and DSD128 files are downsampled to 88.2kHz. Of course, you can always simply disable Dirac Live and play ultra high resolution files natively. I found, however, that the benefits of room correction, which are clearly audible, outweighed the negatives of downsampling, which are much less audible. I’d be surprised if you didn’t come to the same conclusion. Nevertheless, I am looking forward to the upgrade which will allow 176.4kHz and 192kHz files to be played natively.
Amarra (version 2.6) also works with Dirac Live, doing the same PCM downsampling as Audirvana Plus. Amarra doesn’t handle DSD files at all, which had disqualified it from consideration in my mind. However, Amarra has just introduced Amarra Symphony ($789) with Dirac Live built-in, so if you are currently an Amarra user and don’t plan to go down the DSD route in the future, upgrading to Symphony will be more elegant than purchasing and running Dirac Live separately. In addition, and of critical importance, Amarra Symphony currently will generate filters up to 384kHz, leapfrogging Dirac Live’s current, and currently planned, implementation. Not that there is much content available at 354.8kHz or 384kHz. The only available music at those sample rates I am aware of is from 2L.
PureMusic (version 1.89g) handles PCM files just like Amarra and Audivana Plus, automatically downsampling where required, so it too is a viable alternative. PureMusic supposedly handles DSD files, but after trying unsuccessfully for over an hour to get it to play back DSD files even without Dirac Live in the mix, I threw in the towel. User error? Most likely. But life is short, and Audirvana Plus just works, so who needs the aggravation.
iTunes without a third party player played back PCM files at all sample rates with Dirac Live, provided you use the MIDI settings to downsample files above 96kHz to 96kHz.
Conclusion
I am extremely excited with the immediate and obvious improvements Dirac Live brought to my system. It took some work to find an optimum filter, but once dialed in, the benefits are significant. The main drawback is that Dirac Live is currently limited to native playback of files with sample rates of 96kHz and below. However, native support for 176.4kHz and 192kHz files is on its way. When it arrives, this will be a killer application that no one is going to want to be without. In the meantime, if you are like me, at least 90% of your digital files are ripped from CDs, so you can get started today without any significant restriction. Even without support of the ultra high sampling rates, the benefits of room correction with Dirac Live in my system clearly outweigh any compromises from downsampling. This is the future, it is here now, and, for me, there is no going back. Simply pressing the space bar revalidates that decision every time. Of course, at a 50% premium, you could also buy Amarra Symphony right now, and have it all (except DSD playback).
- Frank Berryman
Contact
Dirac Research
Fålhagsleden 57, 753 23 Uppsala, Sweden
Telephone: +46 (0) 18-18 56 40
Fax: +46 (0) 18-18 56 49
www.dirac.se
Associated Equipment
Analog Source: VPI Scout; Dynavector 20X2; Musical Surroundings Phonomena II
Digital Sources: Meridian G08; Mac Mini; dCS Debussy; Audirvana Plus
Preamplifier: Meridian G02
Power Amplifiers: Pass Labs XA100.5
Loudspeakers: Magnepan 1.7
Analog Cables: Kimber Select KS1016 and KS1116
Digital Cables: Kimber Select KS2020 and KS2416 USB
Speaker Cables: Kimber Select KS6063 and KS9033
Power Cables: Kimber PK10G and PK14G
Headphones: Etymotic ER-4S
Accessories: Audience aR2p power conditioner


